Hi everyone, in this article we will look at 12 important settings in the YouTube application that you may not have tried before. There are many settings in this YouTube application that are quite useful and it turns out that there are still many who don’t know and don’t use them. The setting that we tried on the YouTube application this time is version 15.46.38.
So, for those of you who haven’t updated to this latest version you can first update the application, then you can follow the tips in this article so that the settings are the same as what we explain in this article. Okay, now let’s just check one by one what its features are.
1. Remind Me to Take a Break
For the first feature, you just have to enter the YouTube application then open the settings in the three top right dots and select settings. Then here select a general setting and select Remind me to break. This feature will remind you to take a short break from watching YouTube if you have watched it for too long. Here you can also a reminder for it’s time to sleep.
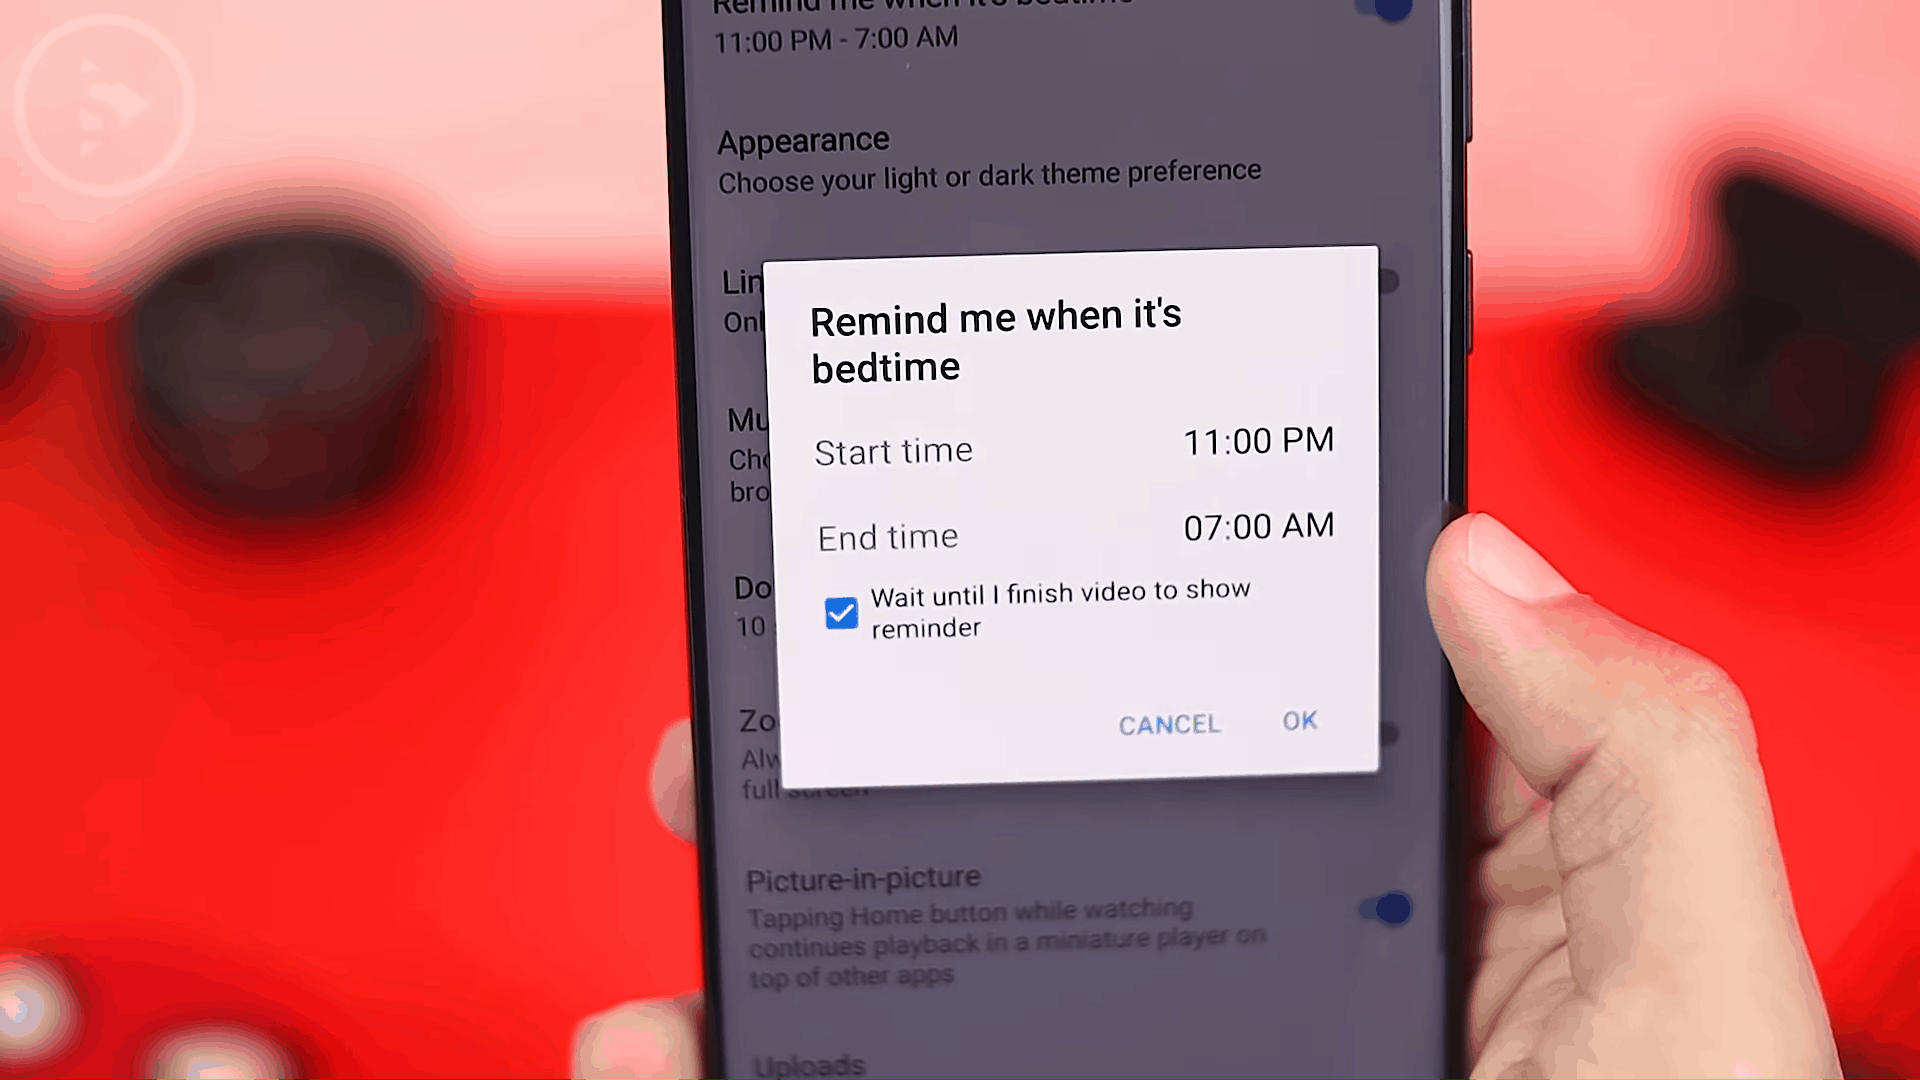
So, you can choose the time here, when is your usual bedtime and later according to your sleep schedule a notification will appear so that you don’t watch YouTube anymore. This is certainly quite helpful for those of you who often have disturbed sleep if you watch YouTube frequently.
2. YouTube Dark Mode

Then the second feature is the Dark mode feature in the YouTube application. This feature exists in previous versions. You can directly access YouTube Dark Mode in the general section and select Appearance. In this Appearance section, all you have to do is select the Dark theme at the very bottom. And show the smartphone which will also be in Dark Mode.
3. Muted Playback in Feeds

Then the next feature is Muted Playback in Feeds. You can activate or deactivate this feature according to your needs. Or you can also activate it only on a wi-fi connection. Usually, the default position is Always On. So, when you scroll through the YouTube feed, it will automatically Autoplay the videos. If you want to save on data packages, you can disable this feature or you can activate this feature when you only connect to Wi-Fi.
4. Change Double Tap to Seek Duration
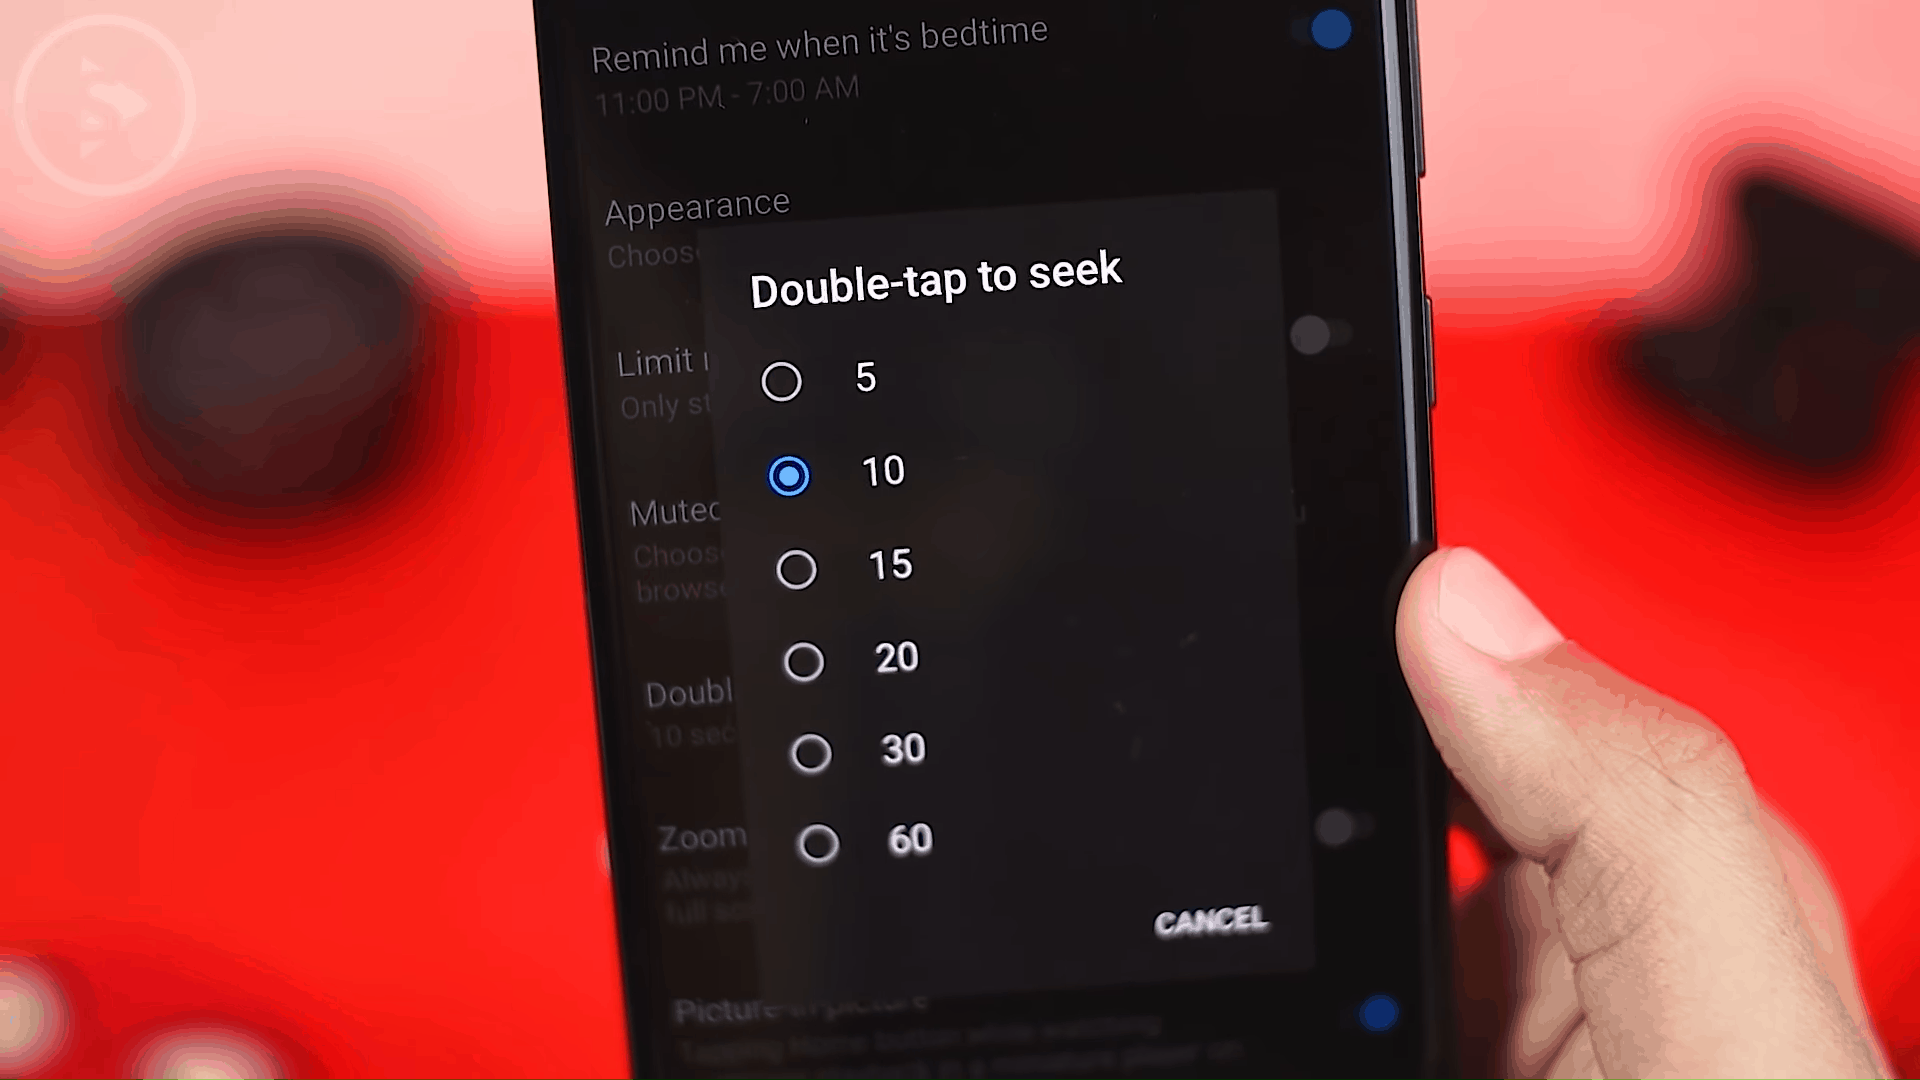
Then, the next feature is Double Tap to Seek. You can take advantage of the Double Tap to Seek feature to skip 10 seconds to the next video. You just have to tap twice on the right to skip to the video for the next 10 seconds, to the left you can also use it to back 10 seconds. If you want to double tap for a longer duration or a shorter duration, you can immediately set the settings earlier. In the general settings section of the YouTube application, you choose Double Tap to Seek. Then here you just have to choose the duration of time you want. You just have to adjust it to your preference.
5. Zoom to Fill Screen
Then the next setting which is also quite interesting is Zoom to Fill Screen. If you watch YouTube videos with a resolution of 16 to 9 like this, there will be black screens on the right and left. If you prefer to watch YouTube in full screen with Zoom like this, you can pinch the screen like this or you can also change the settings just now.

So, all the videos you watch will immediately change to fill screen mode like this. So, you don’t need to pinch manually anymore. In the general settings section, you select the Zoom to fill screen. So, when you watch YouTube, you will immediately enter Zoom mode to fill this screen. So, the video will immediately fill the entire screen.
6. Picture in Picture

Then the next feature is the Picture in Picture feature. Unfortunately, this feature only exists for the premium version of YouTube. You can activate the picture in picture feature to activate YouTube videos to be watched while using other applications. So, you can immediately use other applications while watching YouTube videos. Of course, this will help and can increase your productivity.
7. Uploads Only on Wi-Fi

Then for those of you who often upload videos to YouTube, you can also choose the settings that upload this. Here you can choose whether you can upload videos on Wi-Fi networks or on all connections. For those of you who use personal quota and only upload on Wi-Fi networks, you can activate the only when on wi-fi feature. So, the video will be uploaded on the wi-fi network only.
8. Autoplay Next Video

Then the next setting is in the Autoplay section. In this Autoplay section there is an Autoplay option for the next video. If you activate this feature, when you watch YouTube videos, it will immediately proceed to the next recommended video. To update this latest version of Youtube, you can also activate the Autoplay feature directly at the top of the video.
9. Background Playback
Then, next is the Background Playback feature. This Background Playback feature is for playing videos in the background even on the locked screen. So, the video can still be played even when the screen is off like this. So, the sound will still be heard. This of course will be quite useful when you use headphones or you just want to listen to the song or sound.

This feature can only be activated for those using YouTube premium and you can deactivate the feature in the settings section. If you don’t want to use this feature and you don’t want a sound to play when you lock the cellphone, you can go straight to the settings then select the background & download. For this background play setting, you just have to turn it off or you can also use headphones or external speakers if you only use them when using headphones or external speakers.
10. Watch on TV
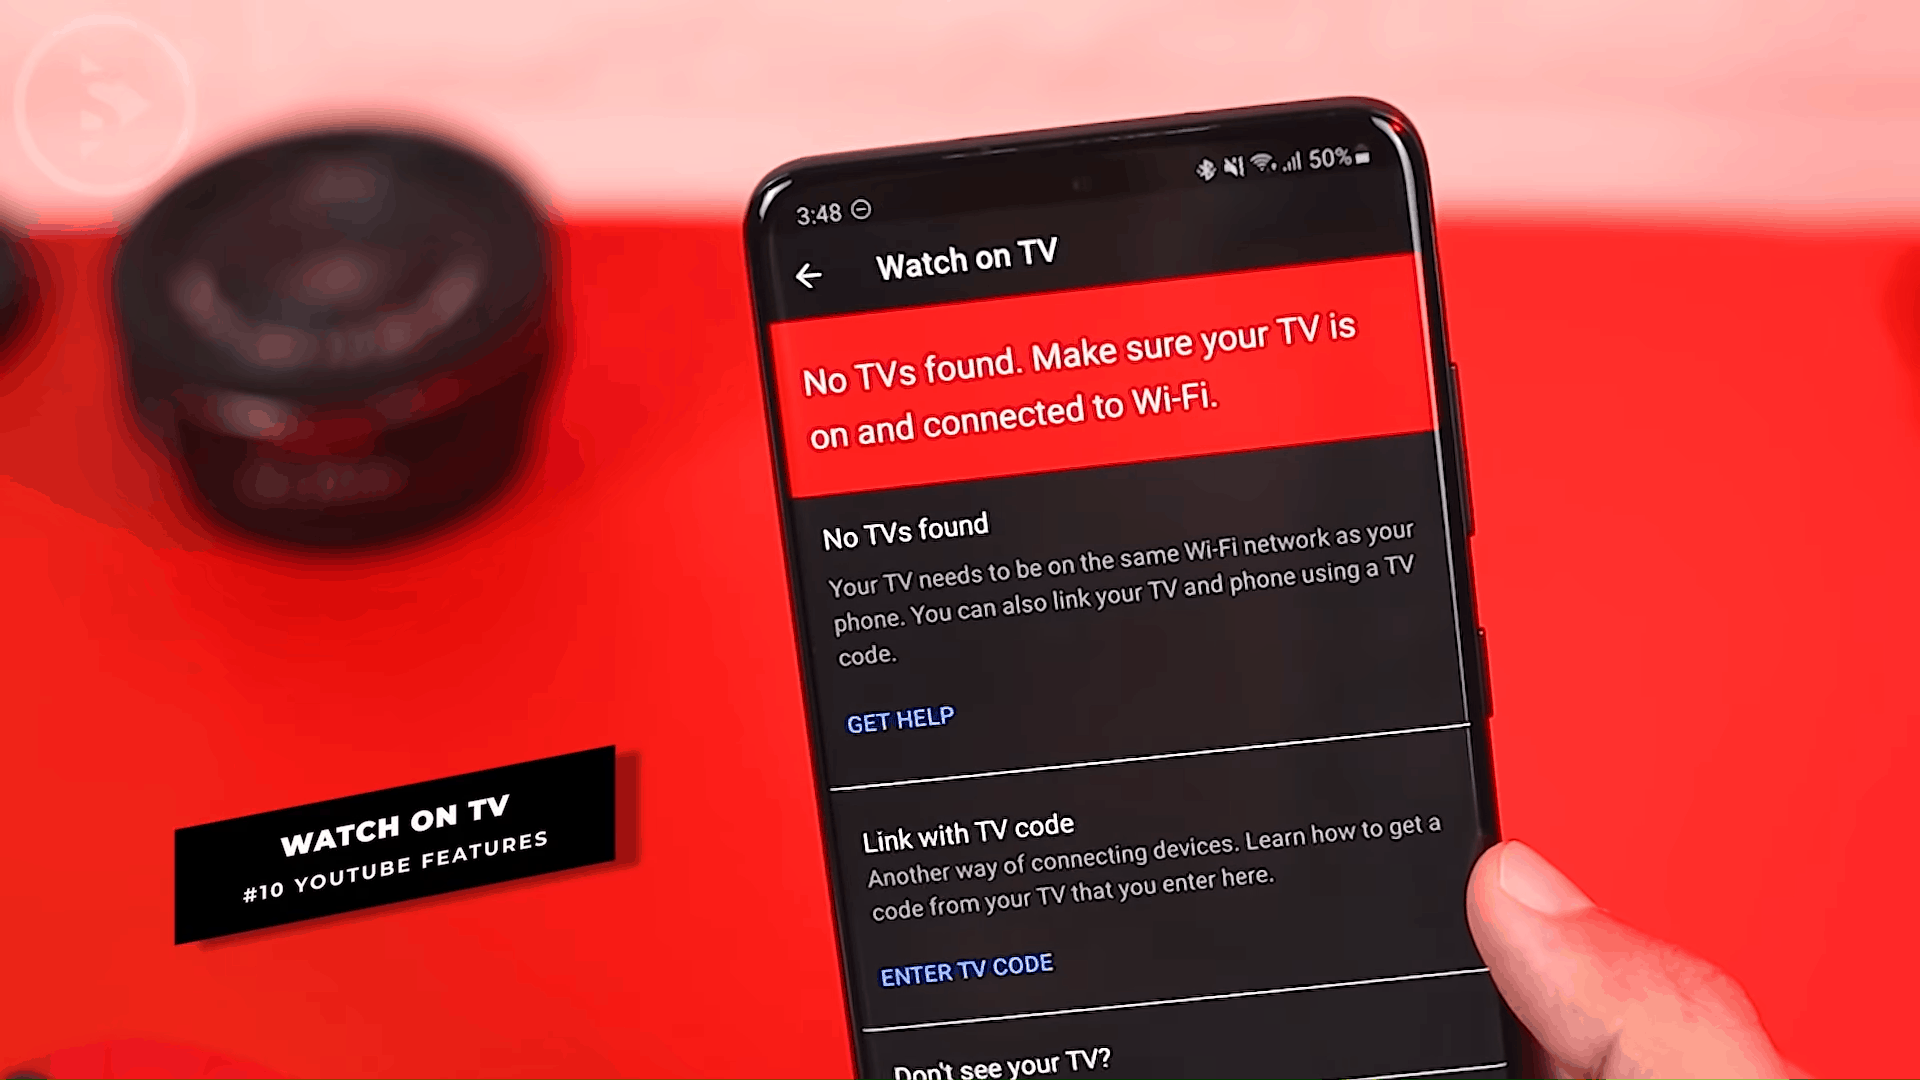
Then the next feature is the Watch On TV feature. We can use the Watch on TV feature to watch YouTube videos directly on your TV. Of course, this feature only supports smart TVs that already support the YouTube application.
Turning on YouTube Videos from Smartphone to TV

To play a video, of course it’s quite easy, you just open the video. To send videos to your TV, all you have to do is click on the Cast icon. Then here you just have to turn on the TV and immediately the supported TV will appear. Later, after you select the video, it will immediately appear on your TV.
11. Scheduled Digest
Then the next setting is a notification problem. In the settings section, you can open the notification, then you can see the Scheduled Digest option. You can activate this feature if you only want to see notifications at certain hours. You can customize the clock according to what you want. So, even if the Creator is uploaded at another time, you will still get the notification according to the time you want. Here you just click OK and the feature will be activated immediately. For example, here the default is 07.00 PM, so you will only get notifications at 7 PM.

You can also adjust the time according to the schedule you have to watch your favorite videos. So, you won’t be bothered with video notifications from YouTube for the hours you don’t want. If you only watch videos at certain times, you can take advantage of this feature.
12. Captions Edit
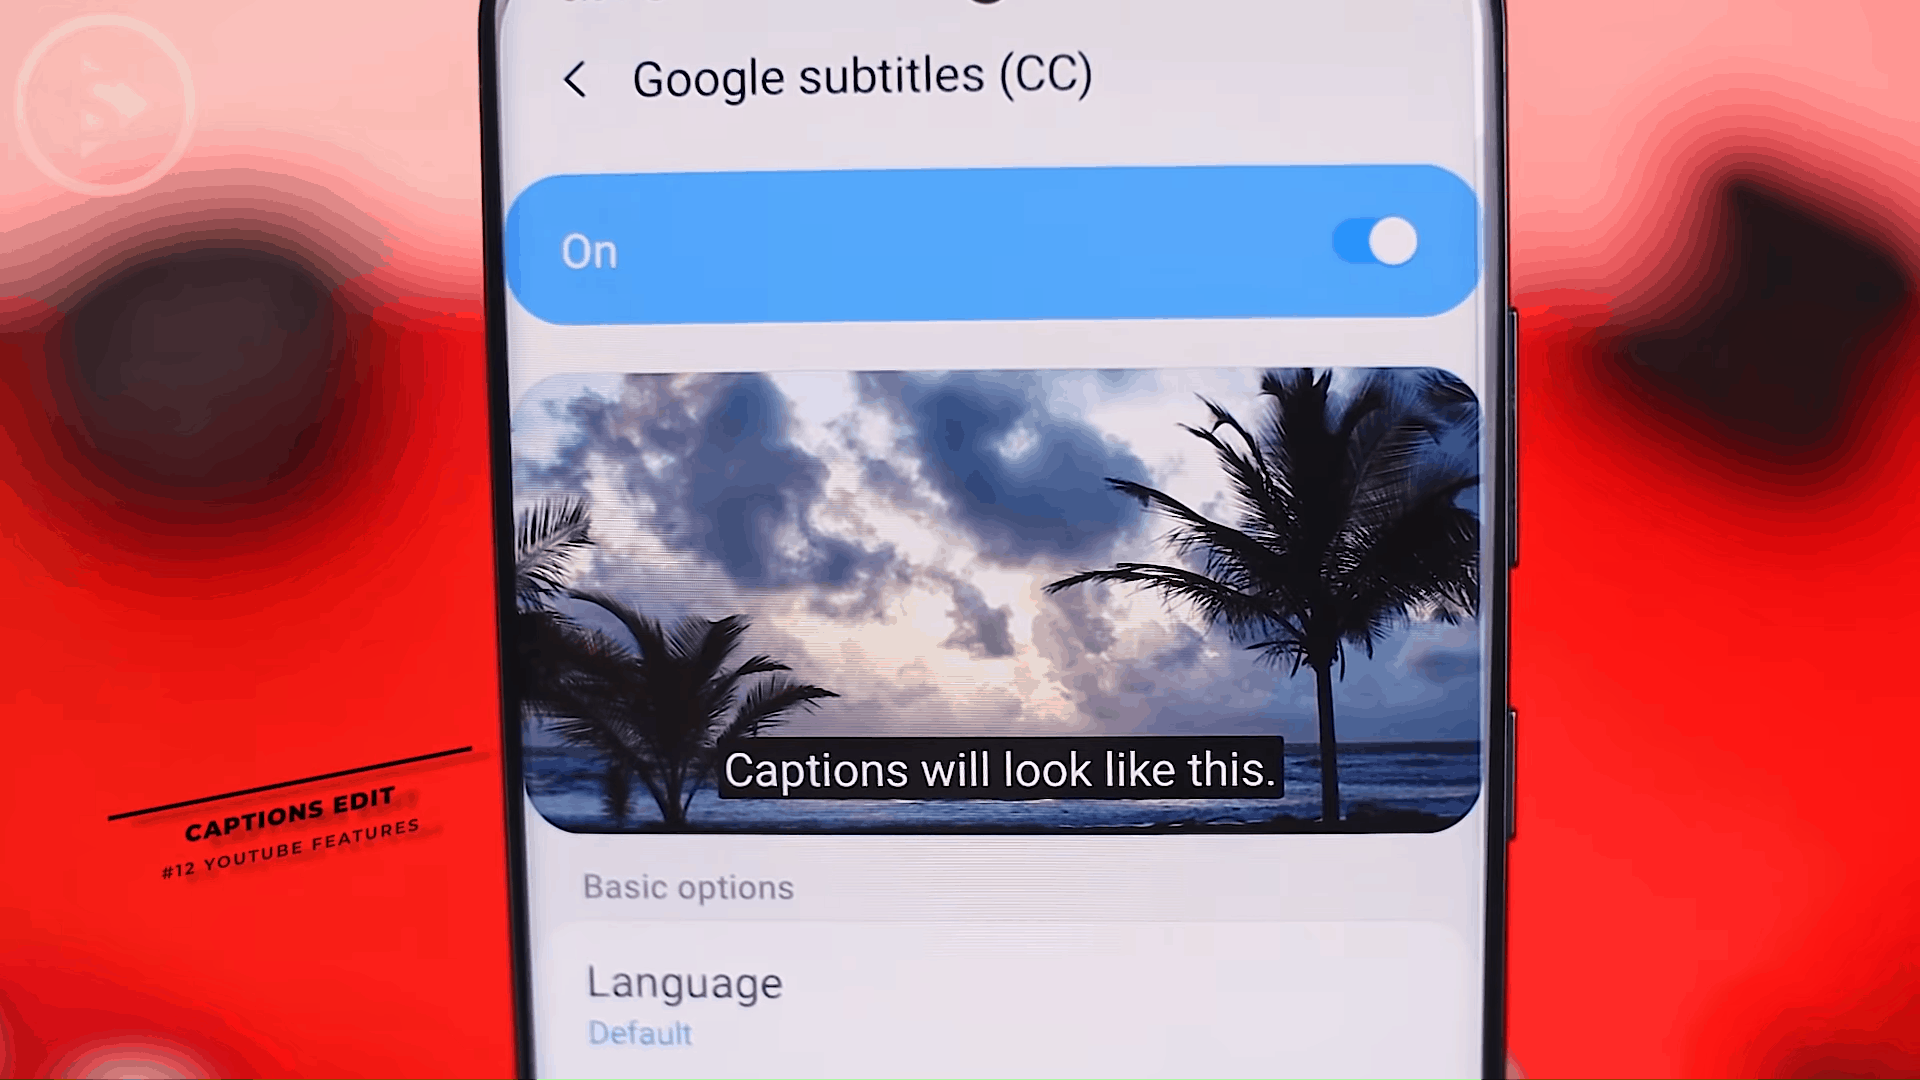
Then the next feature that you can adjust is the edit caption feature. To display the caption for YouTube, the default will look like this. If you want to change the caption form of a YouTube video, you can immediately change it in this setting. You can choose in the settings, then select the Captions in the section below. In this setting, you can adjust the size of the caption text. You can reduce it or you can make it bigger. For example, if you want a smaller caption, you can choose the small one.
Changing YouTube Captions Color and Size
Then for the color, you can also change it according to your taste. Here are some of the default colors you can choose from. You can also change the color to your liking in the right section of the costume. For this manual custom, you can immediately choose the color as you like. There are many color choices that you can choose directly in this section. You can also choose the opacity of the background: there are two 25% 50% to 100%. For example, here we change the background color for the caption, so the caption will look like this.

So, when you watch a YouTube video that has a caption, the color display will match what you adjusted earlier. For example, here we have chosen the text color to be white and the background color is blue, so the caption will immediately look like this.
Editing Fonts on YouTube Captions
You can also customize the font, here are several font choices that you can change. For example, if you change the color and font for this caption, it will look like this. You can change the settings for this caption and color so that it looks more attractive.

If you have any questions or comments, you can immediately write them in the comments section down below, or you can ask questions directly in our telegram group at the following link t.me/santerta. or ask directly on our Instagram DM, at @santertainment.
You can also check the video version here: